Harpoon: A Flow-level Traffic Generator
User Manual
A pdf version of this document is available.
The software is available from the
Harpoon github repository.
Release history in brief:
- June 2004, Initial release (SIGMETRICS).
- September 2004, Updated release (Internet Measurement Conference).
- December 2005, Updated release (Relicensed as GPL; various bug fixes).
Older versions of Harpoon may be obtained if desired - just ask.
This manual is for the Harpoon Flow-level Traffic Generator. The
following copyright notice covers the Harpoon source code, including
all documentation, images, and ancillary files.
Copyright © 2004-2005, Joel E. Sommers. All rights reserved.
This file is part of Harpoon, a flow-level traffic generator.
Harpoon is free software; you can redistribute it and/or modify
it under the terms of the GNU General Public License as published by
the Free Software Foundation; either version 2 of the License, or
(at your option) any later version.
Harpoon is distributed in the hope that it will be useful,
but WITHOUT ANY WARRANTY; without even the implied warranty of
MERCHANTABILITY or FITNESS FOR A PARTICULAR PURPOSE. See the
GNU General Public License for more details.
You should have received a copy of the GNU General Public License
along with Harpoon; if not, write to the Free Software
Foundation, Inc., 51 Franklin St, Fifth Floor, Boston, MA 02110-1301 USA
1. Overview of Harpoon
Harpoon is a flow-level traffic generator. It uses a set of
distributional parameters that can be automatically extracted from
Netflow traces to generate flows that exhibit the same statistical
qualities present in measured Internet traces, including temporal and
spatial characteristics. Harpoon can be used to generate
representative background traffic for application or protocol testing,
or for testing network switching hardware. This manual begins by
describing the architecture of Harpoon. Subsequent chapters describe
how to effectively configure, run, and manage Harpoon.
A suggested roadmap for getting up and running with Harpoon is to read
this chapter, Overview of Harpoon, followed by the next
chapter, Basic Configuration, referring as needed to
Running Harpoon and More Examples
for command-line parameter, environment variable,
and specific examples. Readers wanting to use the self-configuration tools
or to deploy Harpoon in large testbeds should read the whole manual.
1.1 Architecture of Harpoon
The design objectives of Harpoon are (1) to scalably generate
application-independent network traffic at the IP flow level, and
(2) to be easily parameterized to create traffic that is
statistically identical to traffic measured at a given vantage point
in the Internet.
Figure 1.1 @ref{dflow,,[High-level data flow diagram of Harpoon]}
depicts a high-level process
flow of these objectives. We start with the basic definition of an IP flow
and use this to create a constructive model for network traffic
generation which we describe below.
|
@float Figure,dflow

@caption{High-level data flow diagram of Harpoon.
IP flow records are collected at a given vantage point in an
operational network using standard software like flow-tools.
Key aspects of the live flows are extracted during a
self-configuration step. These parameters are used to generate
traffic in a testbed that statistically matches the temporal (diurnal)
volume characteristics as well as the spatial (source and destination
IP address frequency) characteristics of the live flows.}
@end float |
An IP flow is typically defined as a unidirectional series of IP packets
of a given protocol traveling between a source and a destination
IP/port pair within a certain period of time. The final condition of
this statement is somewhat ambiguous, so we pragmatically tie our
definition to Cisco's implementation of Netflow and to the tools
we use to gather and analyze network flow data. Netflow data includes
source and destination
AS/IP/port pairs, packet and byte counts, flow start and end times,
protocol information, and a bitwise OR of TCP flags for all
packets of a flow, in addition to other fields. This data is exported
either on timer deadlines or when certain events occur (e.g., a TCP
FIN or RST, or a cache becomes full), whichever comes first. While
this would seem to pragmatically resolve ambiguity in the definition
of a flow, specific expiration-related timing behaviors can vary
(see Cisco Netflow White Paper(1)).
The result is that flow start time stamps are accurate, while
flow end time stamps are not. This inaccuracy does not impact a user
of Harpoon, but it does make a difference to the self-configuration
tools. For more details, see the Harpoon technical paper.
From this operational definition of a flow, Harpoon's architecture
begins with the notion of unicast file transfers using either TCP or
UDP. Harpoon does not address the packet level dynamics of TCP file
transfers. Rather, it relies on the version(s) of TCP running on end
hosts to transfer the requested file. Modeling UDP traffic is
complicated by the fact that packet emission behaviors are largely
application-specific. At present, Harpoon contains three models of
UDP packet transfer: a simple parameterized constant packet rate,
a fixed-interval periodic ping-pong, and an exponentially distributed
ping-pong. The first source type is similar to some audio and video
streams, while the latter two types are intended to mimic the standard
Network Time Protocol (NTP) and Domain Name Service (DNS),
respectively. UDP traffic in today's Internet is likely to be made up
of a wider variety of application level traffic (including voice, SQL
worms, etc.) whose behavior is not captured in our current three
source-type model. Development of a model with a more diverse set of
UDP traffic sources is left for future work.
The Harpoon flow model is a two level architecture and is depicted in
Figure 1.2
@ref{arch,,[Harpoon's flow-based two level hierarchical traffic model]}. We refer to the lower level of the Harpoon
model as the connection level. It is made up of two components that
have measurable distributional properties. The first component is the
size of the file transferred, and the second component is the
time interval between consecutive file transfer requests, the
inter-connection time. Harpoon makes requests for files with
sizes drawn from an empirical distribution P_{FileSize.
Connection initiations are separated by time intervals drawn from an
empirical distribution P_{InterConnection.
The upper level of the Harpoon model is referred to as the
session level. Harpoon sessions are divided into either
TCP or UDP types that conduct data transfers using the respective
protocol during the time that they are active. The session level has
two components: the number of active sessions and the IP
spatial distribution. By modulating the number of sessions that are
active at any point in time, Harpoon can match the byte, packet, and
flow volumes from the original data and realize the temporal (diurnal)
traffic volumes that are a common characteristic of the
Internet(2). The
average number of sessions of each type (TCP/UDP) that are active at
any point in a day is derived from a flow data time series for
consecutive non-overlapping intervals of length
IntervalDuration seconds to create an empirical model for
P_{ActiveSessions. Scalability is naturally achieved by
dividing the number of active sessions across any number of hosts
comprising the testbed. For each session, Harpoon picks source and
destination addresses from ranges of available addresses to make a
series of file transfer requests. The address selection is made
preferentially using weights drawn from empirical distributions
P_{IPRange_{src and P_{IPRange_{dest. A series of
file transfer requests then takes place between the source and
destination for IntervalDuration seconds. When Harpoon is
started, it begins with the average number of sessions in the first
interval and proceeds through consecutive intervals for the duration
of the test.
In summary, the Harpoon model is made up of a combination of five
distributional models for TCP sessions: file size, inter-connection
time, source and destination IP ranges, number of active sessions. There
are three distributional models for UDP sessions: constant bit-rate,
periodic and exponential ping-pong. Each of these distributions can
be specified manually or, in the case of TCP traffic, extracted from
packet traces or Netflow data collected at a live router. These models
enable the workload generated by Harpoon to be application independent
or to be tuned to a specific application. The models are combined in
a constructive manner to create a series of file transfer requests that
results in representative flow-level network traffic.
The parameters for TCP sessions are summarized below:
- Parameter
Description
- P_{FileSize
Empirical distribution of file sizes transferred.
- P_{InterConnection
Empirical distribution of time between consecutive TCP connections initiated
by an IP source-destination pair.
- P_{IPRange_{src and P_{IPRange_{dest
Ranges of IP addresses with preferential weights set to match the
empirical frequency distributions from the original data.
- P_{ActiveSessions
The distribution of the average number of sessions (IP source-destination
pairs) active during consecutive intervals of the measured data. By
modulating this distribution, Harpoon can match the temporal byte,
packet and flow volumes from the original data.
- IntervalDuration
Time granularity over which Harpoon matches average byte, packet and
flow volumes
|
@float Figure,arch
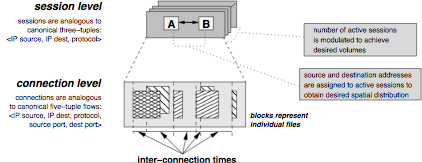
@caption{Harpoon's flow-based two level hierarchical traffic
model. Sessions are comprised of a series of connections separated
by durations drawn from the inter-connection time distribution.
Source and destination IP address selection (A and B in the figure) is
weighted to match the frequency distribution of the original flow
data. The number of active sessions determines the overall average
load offered by Harpoon. A heavy-tailed empirical file size
distribution and an ON/OFF transfer model generate self-similar
packet-level behavior.}
@end float |
1.2 Harpoon Software Components
There are five programs and scripts included with Harpoon:
harpoon, the main executable, along with
traffic generation plugins for implementing Harpoon
user-level behavior using OS-supplied protocol implementations
(e.g. TCP) or another kind of packet emission processes,
config_validator, a utility for validating the
structure of a config file.
harpoon_flowproc, a utility for pre-processing flow
records (raw Netflow version 5 or flow-tools format) for
self-configuration, and
harpoon_conf.py, a utility for generating
configuration files for harpoon (the self-configurator).
harpoon_reconf.py, a utility for tuning existing configuration
files to produce desired traffic volumes.
harpoon, config_validator, and harpoon_flowproc
are C++ programs. Requirements for building Harpoon include a C++ compiler
with a functional standard template library (recent versions of GCC easily
satisfy this requirement), a POSIX threads implementation, and the
eXpat XML parsing library(3).
The flow-tools(4)
library is optionally used by harpoon_flowproc. If no installation
of flow-tools is found, the harpoon_flowproc tool will still
be built, but will only be able to process wire format Netflow 5 records.
The scripts harpoon_conf.py and harpoon_reconf.py require
a Python interpreter, version 2.3 or
greater(5). If a suitable Python
interpreter is not found, the other tools will be built, but a warning
will appear when configuring the software.
The traffic generation plugins exist as dynamically loadable modules
(aka shared libraries, dynamically linked libraries, bundles). For
example, all logic specific to generating TCP flow traffic is confined
to the TCPPlugin module and all logic specific for UDP
constant bit-rate traffic generation is confined to the
UDPcbrPlugin module. (Creating New Traffic Generation Modules describes how to create modules to generate any type of
desired traffic.) You do not have to know how these modules work to
generate basic TCP or UDP-CBR traffic, but you should understand the
basic roles of the distributions used by different Harpoon plugins
in order to feed properly formatted configuration files to Harpoon.
Subsequent chapters describe how to use these tools to produce desired
traffic. For basic configuration using sample configuration files supplied
with the Harpoon software distribution, see Basic Configuration. For
more extensive discussion of configuring Harpoon using the self-configuration
tools, see Advanced Configuration. Command-line options, applicable
environment variables, and signal handling for the above tools are covered
in Running Harpoon. Finally, more examples on configuring, using,
and managing Harpoon are given in More Examples. Note that this manual
assumes a working knowledge of UNIX-ish systems and shell commands. If
you need help on those basics, look elsewhere.
1.2.1 Building the Harpoon Software
Building Harpoon consists of the following steps:
Unpack the distribution. Using GNU tar,
"tar xzvf harpoon_distribution.tgz" will do the trick, substituting
the particular file name for "harpoon_distribution.tgz".
Run ./configure in the top-level directory of the unpacked
software. This step will build appropriate make files for your system.
Optionally, you may use the -prefix flag to specify where the software
is to be installed. The installation location defaults to
/usr/local/harpoon.
Run make. By default, the main components of Harpoon, all
plugins, and some (presently undocumented) miscellaneous tools are built.
If available, use GNU make, since some make programs do not properly handle
some of the constructs in Harpoon's makefiles.
(optional) make selfconf. Build the self configuration tool
harpoon_flowproc.
(optional) make doc. You'll need the GNU texinfo tools and/or
doxygen for this to work.
(optional) make install. Move the appropriate components
to the installation target directory. By default, the install directory
is /usr/local/harpoon.
Harpoon is known to build and run on FreeBSD 5.1-5.4, Linux 2.2-2.6,
MacOS X 10.2-10.4, and Solaris 8-10. Harpoon does not build on Windows,
though there is an intent to eventually make that possible.
If configure does not find certain required libraries, you might
try the following syntax:
| | $ CPPFLAGS=-I/path-to-include-files LDFLAGS=-L/path-to-libs \
./configure
|
This syntax generally works to force configure to look in the
right directories.
By default, harpoon is built with optimization level `-O2' and
with debugging symbols `-g'. An easy way to change this is to use the
above syntax recipe:
| | $ CXXFLAGS="-g" ./configure
|
The above example will build Harpoon with debugging symbols but no
optimization. Building Harpoon without debugging symbols and a desired
level of optimization can be accomplished in a similar way.
Finally, you'll very likely have to set LD_LIBRARY_PATH (Linux, FreeBSD and
Solaris) or DYLD_LIBRARY_PATH (MacOS X) to the directory where plugin
objects are installed. See section Environment Variables for further information.
2. Basic Configuration
This chapter discusses simple configurations of Harpoon using the supplied
example config files (in the `examples' subdirectory of the software
distribution). Simple changes to the config files to accomodate local
addressing and traffic volume requirements are also discussed. The next
chapter discusses more complicated configurations of Harpoon using your
own flow records. It is assumed here that you have successfully built Harpoon
(See section Building the Harpoon Software).
Example configurations are found in the `examples' subdirectory.
There are two TCP traffic configuration examples provided:
- `tcp_client.xml' and `tcp_server.xml'
A very simple setup for illustrative purposes only.
- `tcp_client_ex2.xml' and `tcp_server_ex2.xml'
A TCP client/server pair with inter-connection times generated from
exponential distribution with mean 1 second and file sizes generated from
Pareto distribution with alpha=1.2 shape=1500 (bytes).
2.1 Validating a Configuration
The first step toward running harpoon should be to make sure
configuration files you intend to use are properly formed. A tool,
config_validator exists for this purpose. The tool takes only
one argument, the configuration file. Shown below is output of
config_validator run on `tcp_client_ex2.xml' and
`tcp_server_ex2.xml'.
| | $ ./config_validator ../examples/tcp_client_ex2.xml
loading ../examples/tcp_client_ex2.xml
bad address - no prefix len?
Checking load of TcpClient
name: TcpClient
objfile: tcp_plugin.dylib
maxthreads: 10
personality: client
client source pool:
address list:
0.0.0.0 - 0.0.0.0 :0 (1)
client destination pool:
address list:
127.0.0.1 - 127.0.0.1 :10000 (1)
dumping distributions (first 10):
active_sessions: 10
interconnection_times: 3.99391 0.293601 2.12709 1.21451 0.409159 0.1121
0.580837 0.101379 0.724933 0.224031
|
There are a number of items to note here:
First, each plugin configuration has a name. The name of this plugin
is TcpClient. The name must be unique for all plugins loaded and running
in the same Harpoon process. (Note that you can have multiple configurations
of TCP plugins running as both clients and servers within a single process,
but they must each have different names.)
The shared object file loaded for this plugin is `tcp_plugin.dylib'.
The operating system loader finds this file by searching the directories
specified by LD_LIBRARY_PATH environment variable.
See section Environment Variables for more information.
In Harpoon, sessions are mapped in a 1-1 fashion onto threads. The
maxthreads plugin attribute specifies the maximum number of operating
system threads to start in the plugin. To generate a specific level of
traffic, a certain number of threads/sessions are made active over successive
intervals of time. This number of active sessions is specified by the
active_sessions distribution. Note that a specified number of active
sessions can be greater than the value given for maxthreads. In this
case, the maxthreads parameter acts as a limit; the actual number of
active sessions is min(maxthreads,ActiveSessions_i),
where ActiveSessions_i is the number of active sessions for
interval i.
See distributional parameters to review the role of sessions in Harpoon.
personality specifies whether this plugin is acting in a
server-side or client-side role.
client source pool and client destination pool denote
address pools used by this plugin. Since this is a client-side plugin,
the client source pool is used to bind the local-side of TCP connections
to a specific local address. In this example, the local address is
0.0.0.0, meaning that the operating system will fill in a default
local address. The client destination pool addresses specify remote
addresses and ports where Harpoon TCP servers are listening.
Finally, 10 random values from the distributions used by the particular
endpoint (client or server) are printed. For TCP clients, there are
two relevant distributions: active_sessions and
interconnection_times.
For TCP servers (example shown below), there are two relevant distributions:
active_sessions and file_sizes.
Validation of the server-side configuration file is now shown below:
| | $ ./config_validator ../examples/tcp_server_ex2.xml
loading ../examples/tcp_server_ex2.xml
bad address - no prefix len?
Checking load of TcpServer
name: TcpServer
objfile: tcp_plugin.dylib
maxthreads: 37
personality: server
server address pool:
address list:
0.0.0.0 - 0.0.0.0 :10000 (1)
dumping distributions (first 10):
active_sessions: 37
file_sizes: 18643900 15150 807481 157679 23465 4930 39188 4418 56341 10863
|
Now that the client-side configuration file has been validated and explained,
there is little new to describe. Note that the name of the plugin has
changed to TcpServer and the personality is server, but the
plugin shared object file is still tcp_plugin.dylib. For servers,
the maxthreads and active_sessions parameters specify the
number of active threads waiting to service file requests. These numbers
can be set to the same single value in most cases. (The problem of how many
threads/sessions to keep active is similar to the problem of configuring
a web server. Unlike modern web servers, Harpoon does not allocate server
threads in a dynamic way, so this number must be statically set in the
configuration files to a reasonable value.) Finally, note that the server
address is set to a default address (0.0.0.0) and the port is
set to 10000.
2.2 Modifying Configuration File Addresses
For the client-side configuration file shown above, the destination address
pool is set to a single address of 127.0.0.1 - the loopback
interface. This isn't particularly helpful, since we would like to generate
traffic over a network, not just through some operating system layers.
This address pool is easily changed.
Using your favorite text editor, open the file `tcp_client_ex2.xml'.
Toward the end of the file the following lines are found:
| | ...
<address_pool name="client_source_pool">
<address ipv4="0.0.0.0" port="0" />
</address_pool>
<address_pool name="client_destination_pool">
<address ipv4="127.0.0.1/32" port="10000" />
</address_pool>
...
|
To change the server address (client_destination_pool), change
the address block 127.0.0.1/32 to be the desired address. For
host prefixes (/32 masks) the mask is optional; specifying 127.0.0.1
has the same effect as specifying 127.0.0.1/32.
(config_validator warns about this lack of prefix, however. See
the above examples for the warning: "bad address - no prefix len?".)
If there are two servers running on separate machines and without contiguous
addresses, simply add another <address ... /> line with the second
address.
Note that for servers, the address pool definition follows the same structure,
but there is a current limitation in that only one address is used for
binding. That is, specifying two addresses for a server to listen on will
not have the desired effect; only one address will be used. For now, using
the default address specifier, 0.0.0.0, is the best option.
2.3 Starting Harpoon
We now have two configuration files with addresses set appropriately. The
examples below show how to start harpoon with these configuration files.
We assume here that the environment variable LD_LIBRARY_PATH has
been set properly (see section Environment Variables). Alternatively, a
shell script run_harpoon.sh is installed when make install
is run that sets the environment variable to the correct directory and
then executes harpoon. The examples below use this script, which
has been installed in the default location of `/usr/local/harpoon'.
On the server machine:
| | $ /usr/local/harpoon/run_harpoon.sh -v10 -w300 -c \
-f examples/tcp_server.xml
...
10:02:16 sev(07) stopping plugin TcpServer
10:02:16 sev(00) TcpServer: plugin stopped - threads killed and reaped
10:02:16 sev(07) starting plugin TcpServer
10:02:16 sev(02) TcpServer: no plugin state existed on start - created
10:02:16 sev(01) TcpServer: started plugin with 1 threads.
10:02:16 sev(01) <stopping plugins: TcpServer:ok ><starting plugins: \
TcpServer:ok >
10:02:16 sev(09) harpoon started. verbosity<10>warp_factor<60> \
autoincr?<1>continuousrun?<1>
10:02:16 sev(05) 00:00 - emulation time tick
...
|
And on the client machine:
| | $/usr/local/harpoon/run_harpoon.sh -v10 -w300 -f examples/tcp_client.xml
...
10:02:40 sev(07) stopping plugin TcpClient
10:02:40 sev(00) TcpClient: plugin stopped - threads killed and reaped
10:02:40 sev(07) starting plugin TcpClient
10:02:40 sev(02) TcpClient: no plugin state existed on start - created
10:02:40 sev(01) TcpClient: started plugin with 1 threads.
10:02:40 sev(01) <stopping plugins: TcpClient:ok ><starting plugins: \
TcpClient:ok >
10:02:40 sev(09) harpoon started. verbosity<10>warp_factor<300>\
autoincr?<1>continuousrun?<0>
10:02:40 sev(05) 00:00 - emulation time tick
...
|
The command-line options used above require explanation:
- ` -v10 '
Turn on verbose messages. You should use this setting (level 10) of
verbosity, especially when first getting started with Harpoon.
- ` -w300'
Set interval duration length to 300 seconds (also referred to as
"warp factor"). Given a specification of <active_sessions> in
a configuration file, Harpoon will iterate through this list,
setting the number of active sessions to each value for durations of
300 seconds. If the original intervals were one hour in length (i.e.,
the average number of sessions was calculated over successive intervals
of one hour) and the `-w' flag is set to 600 seconds, a 24 hour
period could be emulated in 14,400 seconds (four hours). It should
be clear from this explanation where the term "warp factor" comes from.
- ` -f [examples/tcp_client.xml, examples/tcp_server.xml]'
Specify the configuration file to load. Multiple `-f' flags
may be used to tell Harpoon to load more than one configuration file.
- ` -c'
While the first three options were used for each side (client and server)
of Harpoon, the `-c' parameter is only used for the server-side.
This option tells Harpoon to continuously cycle over its list of
active sessions, specified in <active_sessions>. Normally, Harpoon
will iterate only once through this list, then cease activity.
For experiments of fixed duration, this is often the desired behavior.
However, for servers this behavior is generally to be avoided. The reason
is that servers (at least for the plugins provided with the Harpoon software
distribution) do not produce traffic without some request or provocation
from clients. It is therefore much easier to simply leave servers running,
cycling over a list of active sessions (typically set to a single value
anyway), much like a continuously running web server.
More information on command-line parameters is given in
harpoon command-line parameters.
Now that the client and server are started, we can get information from
these processes via XML-RPC. Using the stats.py script in the
`cli' subdirectory (and a Python interpreter of version 2.2 or greater):
| | $ python ./stats.py -u http://servermachine:8180/ \
-u http://clientmachine:8180/
stats for <ServerProxy for servermachine:8180/>
server-wide information:
emulation_interval 1
----
plugin-specific information:
TcpServer is running - up for 81 seconds
target threads = 1 active threads = 1
num_transfer = 36
send_bandwidth_total_bps = 35555.6
send_bandwidth_recent_bps = 35555.6
bytes_sent_total = 360000.0
bytes_sent_recent = 360000.0
personality = server
stats for <ServerProxy for clientmachine:8180/>
server-wide information:
emulation_interval 0
----
plugin-specific information:
TcpClient is running - up for 21 seconds
target threads = 1 active threads = 1
num_requests = 10
personality = client
|
Note that the statistics gathered using the stats.py tool are
approximate and only reflect an application point of view.
You should not use them in any "real" measurements (like for
paper submissions!). They are there to simply help with diagnosing and
monitoring currently running
Harpoon processes. Other XML-RPC tools are provided in the `cli'
subdirectory. More information on them is provided in Managing harpoon.
2.4 Modifying a Configuration to Produce Different Traffic Volumes
A common requirement is for harpoon to generate a specific average load.
A tool, harpoon_reconf.py is provided to assist in determining the
appropriate number of sessions to configure at a client to produce the
desired level of traffic.
If we wish to set the number of sessions so that the traffic rate (bandwidth)
produced by Harpoon is 5 Mbps averaged over a 10 minute interval, we can use
the harpoon_reconf.py tool as follows
(from the top-level Harpoon source directory):
| | $ python selfconf/harpoon_reconf.py -d -c examples/tcp_client_ex2.xml
-s examples/tcp_server_ex2.xml -i 600 -r 5000000
...
targetbytes 375000000.0 simbytes 378522468 median 4 mean 3 \
stdev 0.771722460186 max 5 flows 4085
number of sessions should be 3 to achieve volume of 375000000 bytes \
(5000000.0 bits/sec)
$
|
The tool reports that the number of active sessions should be set to 3 (the
mean).
The options used for harpoon_reconf.py are as follows:
- ` -d'
Turn on verbose (debugging) information.
- ` -c examples/tcp_client_ex2.xml'
Specify the client-side configuration file. This is a required parameter.
- ` -s examples/tcp_server_ex2.xml'
Specify the server-side configuration file. This is a required parameter.
- ` -i 600'
Specify the interval duration. The value used for this parameter should be
the same as the `-w' parameter passed to harpoon.
See harpoon command-line parameters and Starting Harpoon for more
information. This is a required parameter.
- ` -r 5000000'
Specify the target traffic rate, in bits per second. Alternatively, you
may use the `-b' parameter to specify the total volume (in bytes)
that should be generated over the specified interval duration (given by
`-i'). One of `-r' or `-b' is required.
Note that the `-d' flag was used, producing verbose output. The
target byte volume to produce over the requested interval of 600 seconds
is 375000000 (5000000 / 8 \times 600 = 375000000).
The mean and standard deviation of the sessions needed to produce 5 Mbps
are 3 and 0.772, respectively. The output value simbytes is the average
amount of traffic (in bytes) estimated to be produced for three sessions.
This value will always be greater than the target (but generally not
too much), since the self configuration tools aim to produce at least as much
traffic as was originally sent.
After restarting the server and client, we use stats.py one
minute later to check the server status and see that Harpoon is producing
roughly 5Mbps. This tool takes only one option, `-u', to specify
the URL of the harpoon XML-RPC listener. By default, port 8180 is used.
| | $ python cli/stats.py -u http://servermachine:8180/
...
TcpServer is running - up for 60 seconds
target threads = 3 active threads = 3
num_transfer = 397
send_bandwidth_total_bps = 4334040.0
send_bandwidth_recent_bps = 6360550.0
bytes_sent_total = 32505300.0
bytes_sent_recent = 13516200.0
personality = server
...
|
Near the end of the test, we run stats.py again to check progress:
| | $ python cli/stats.py -u http://servermachine:8180/
...
TcpServer is running - up for 557 seconds
target threads = 3 active threads = 3
num_transfer = 4217
send_bandwidth_total_bps = 6247000.0
send_bandwidth_recent_bps = 5237350.0
bytes_sent_total = 434947000.0
bytes_sent_recent = 75286800.0
personality = server
...
|
We see that Harpoon is making a pretty good match to 5 Mbps and is quite
close to the average match_rate calculated above.
Recall that the matching is done based on some interval of time
(@pxref{arch,,[Harpoon's flow-based two level hierarchical traffic model]}).
Note also that this matching is approximate, and depends on many factors. The
nature of the underlying distributions (file sizes and interconnection times)
have a great impact on the goodness of the match, but selection of the
interval duration also has a significant effect. Generally, longer intervals
(i.e. five or ten minutes) are best. Very often the match between
what you expect and what you get is quite good, but it can be "less good"
if you pick a short interval and have distributions with extreme variability.
3. Advanced Configuration
In the previous chapter, basic configuration of Harpoon was discussed,
including configuration file validation, setting desired endpoint addresses,
and tuning Harpoon to produce the desired traffic volume. This chapter
fills in gaps from the previous chapter by discussing, in more detail,
the structure of Harpoon configuration files (using the TCP traffic
generator plugins as the basis for discussion), and the use of
the self-configuration tools.
Harpoon uses XML documents for its config files. As described in
validation of config files, an XML schema
is distributed with Harpoon that defines the structure of config files
for the supplied TCP traffic plugin.
Tools are provided to automatically generate configuration files from raw
flow records. There is also a tool,
config_validator, which is a simple validator of config files.
The validator can't catch all logical errors, but it will catch all
syntactical errors.
While the self-configuration tool harpoon_conf.py can generate valid
config files for Harpoon, it is often useful to manually tweak the files
produced by this script depending on testbed requirements. For this reason,
description of how to use the self-configuration tools is followed by
a discussion of the detailed structure of configuration files.
3.1 Self-Configuration Tools
For self-configuration, there are two required steps, and one optional step.
Process flow records using the harpoon_flowproc tool.
The flow records can be in Netflow version 5 wire format or in
flow-tools format. The output of this step is an intermediate flow
representation.
Process the intermediate format produced in the previous step using
the harpoon_conf.py tool to produce Harpoon config files.
Optionally, the configuration files produced in step 2 can be
processed to produce a bit rate different from the original flow trace.
The harpoon_reconf.py tool takes two Harpoon configuration files
as input to perform this task.
3.2 The harpoon_flowproc tool
The harpoon_flowproc tool takes raw flow records in either
Netflow version 5 wire format, or in flow-tools format. If
your system does not have flow-tools installed, you'll only
be able to use the raw Netflow capability. The tool takes the flow
records as standard input and produces an intermediate format on standard
output. This intermediate format is used by the tool
harpoon_conf.py (see section The harpoon_conf.py tool, below) to
produce configuration files for Harpoon.
By default, harpoon_flowproc uses an IntervalDuration value
of 60 seconds, expects TCP flags in the flow records, and expects the input
format to be flow-tools. See harpoon_flowproc for
more information on command line options. The example below shows
an hour's worth of flow records being piped into harpoon_flowproc,
with the output written to `flowproc.out'. It shows that there
were over 4 million flows over that hour, with about 1.8 million TCP flows.
However, only 1.2 million TCP flows had SYN and FIN or RST flags (i.e.,
were "well-formed"). Finally, flow surgery did not have to be performed
on any of the flows. (Note that it isn't abnormal that surgery is minimal
or not required, at least on flow record traces I've looked at.)
| | $ flow-cat ft-v05.2002-07-31.13* | ./harpoon_flowproc -i 60 > flowproc.out
sorting tcp flow records... took 25 sec.
total flows: 4071060
total TCP flows: 1867860
total well-formed TCP flows: 1216691
surgery performed: 0
$
|
3.3 The harpoon_conf.py tool
The Python script harpoon_conf.py uses the output from the tool
harpoon_conf to produce configuration files for Harpoon.
In the example below, an interval duration of 600 seconds is specified
(`-i' 600), source and destination address pools are specified
(`-S' and `-D' options), and output config files have
a prefix of "testoutput". See harpoon_conf.py for
more information on command line parameters.
| | $ ./harpoon_conf.py -i 600 -S '10.54.1.0/24' -D '10.54.42.1/32' \
-p testoutput flowproc.out
got starting time from file header: 1028138318.2
progress (10k lines): . . . . . . . . . . 100000
. . . . . . . . . . . 200000
. . . . done ( 232645 lines)
$
|
The configuration files resulting from this script may still need to be
tweaked. In particular, the number of active sessions set in the client
configuration file may exceed the maximum number of threads per
process on the operating system where Harpoon will be run. Either that,
or you may wish to set up a multi-host configuration, splitting the load
generation over some number of machines. For these situations, you will
have to manually edit the configuration files, changing the number of
active sessions to an appropriate value, and setting client source
and destination addresses to appropriate values.
3.4 The harpoon_reconf.py tool
The harpoon_reconf.py is used to tune existing client and
server configuration files to produce a specified bit rate. The configuration
files that this script uses can be produced by the harpoon_conf.py
tool or can be made using configuration files based on distributions from
known distributions. In the example below, the target rate is specified
as 5 Mbps and the script reports that 314 sessions should be configured
to produce this volume. The script itself does not modify the configuration
files, so this value must be set in the client configuration file.
See also Modifying a Configuration to Produce Different Traffic Volumes,
and harpoon_reconf.py.
| | $ ./harpoon_reconf.py -d -c testoutput_tcpclient.xml \
-s testoutput_tcpserver.xml -i 300 -r 5000000
target volume: 187500000.0
interval duration: 300
client conf file: testoutput_tcpclient.xml
server conf file: testoutput_tcpserver.xml
target: 187500000.0 carry: 0
targetbytes 187500000.0 simbytes 187720505 median 320 mean 314 \
stdev 55.02035895 max 415 flows 16174
number of sessions should be 314 to achieve volume of 187500000 bytes \
(5000000.0 bits/sec)
$
|
3.5 Configuration File Structure
The best way to describe the structure of Harpoon config files is
through an example:
| | <?xml version="1.0"?>
<harpoon_plugins>
<plugin name="Example" objfile="example.so"
maxthreads="42", personality="server">
...
</plugin>
</harpoon_plugins>
|
The top-level tag in any config file must be <harpoon_plugins>.
Within that element, any number of traffic generation <plugin>s
may be defined. Every Harpoon configuration file must be
structured this way - the XML parser that Harpoon uses (expat
-- http://expat.sourceforge.net/) enforces this requirement.
3.5.1 <plugin> Definitions
For the <plugin> element, there are three require attributes,
and one optional attribute:
- name
An identifier for this plugin. It must be unique for all incarnations
of a traffic generator module running under the control of a single
harpoon executable. That is, you must have separate
<plugin> tags defined for client and server portions of the
same traffic generator if they are running in the same
harpoon process. For example, for the client-side of a TCP
plugin you might use the name "TCPClient" and for the server-side
you might use "TCPServer".
- objfile
The object file into which traffic generation code is compiled. For
most UNIX-like operating systems, this file will end in the extension
.so. For MacOS X, this extension is normally .dylib.
- maxthreads
An integer defining the maximum number of threads to create for this
plugin. One thread represents one Harpoon session. Note
that different operating systems impose limits on the maximum number
of threads per process. Harpoon will happily attempt to create one
million threads if you ask it to -- it is up to you to make sure this
number makes sense. If Harpoon is unable to create the number of
threads you ask for it will croak, leaving both you and the formerly
running harpoon quite miserable.
- personality
This attribute should contain the value `server' or `client'.
Harpoon is organized as a client-server application. This attribute
specifies how the traffic generator named in the configuration file should
behave, either as a client or as a server. More specifically, each plugin
module has two code entrypoints: server_session and
client_session. The entrypoint taken depends on this attribute.
See Creating New Traffic Generation Modules for more details.
3.5.2 Configuring Distributions
Within a <plugin> element, you define the distribution data
used by the plugin. Depending on the "personality" of the plugin and
on the particular traffic generator, different distributions may be required.
For example, for the TCP client, file sizes are irrelevant since it is the
server that generates files. Note that the config_validator tool
does not assume that all distributions are required and checks only
for the existence of distributions that make sense based on the configured
personality.
As described in Overview of Harpoon and summarized in
distributional parameters, there are five distributions
comprising Harpoon's architectural model for TCP flows. Configuration of
three of those parameters is described here. Addressing is described in the
following section.
Each of the parameters P_{FileSize, P_{InterConnection,
P_{ActiveSessions, P_{IPRange_{src, and
P_{IPRange_{dest
are configured using XML tags
<file_sizes>, <interconnection_times>, <active_sessions>,
and <address_pool>, respectively, also
shown in the example below. Whitespace-separated values for each
distribution should be written between start and end tags for the respective
element. There is no required order among these tags.
For the TCP plugin, servers expect <file_sizes> and
<active_sessions>. File sizes values are given in bytes.
Clients expect <interconnection_times> and <active_sessions>.
Interconnection times are given in (floating point) seconds. Both endpoints
require <address_pool> tags, as described below.
The <active_sessions> tag identifies the number of Harpoon sessions
(threads) that should be active for a given interval. By default, this
interval is assumed to be an 60 seconds, though it need not be so. By
adjusting the "warp factor" (`-w' option,
harpoon command-line parameters)
on the harpoon command-line, any mapping between emulation
time and wall-clock time may be made. The Harpoon plugin controller
will adjust the number of active threads per interval according to the
distribution given in <active_sessions>. By default, Harpoon will
iterate once through the list of <active_sessions>, then
plugin activity will cease (i.e., number of active sessions will
be set to 0). For clients, this is often the desired behavior. For servers,
however, this is very often not desirable. The `-c' flag can be
given to Harpoon so that it cycles continuously over its list of
<active_sessions>.
The maxthreads attribute described above serves as a cap to the
number of threads to be created for a plugin. If values given for
<active_sessions> exceeds maxthreads, no threads beyond
maxthreads will be created. For the client-side, the
relationship between the values given for <active_sessions> and
load generated by Harpoon should be straightforward. For servers, it
is often best to simply supply one value (which should usually be the
same as the value given for maxthreads) so that enough server
handlers are running at all times. Choosing this value is akin to
provisioning a web server, and the default values set by the Harpoon
configuration tools may or may not need tuning in different environments.
The next two examples show how the three distributions described above
appear in configuration files. For these examples, the plugin
headers (attributes) are not specified, only the applicable distributions.
For a TCP server, only the <active_sessions> and <file_sizes>
elements are required:
| | <plugin … >
<!-- for a TCP server configuration -->
<active_sessions>
47
</active_sessions>
<file_sizes>
200 42000 300 1200 5400 …
</file_sizes>
…
</plugin>
|
For a TCP client, only the <active_sessions> and
<interconnection_times> elements are required:
| | <plugin … >
<!-- for a TCP client configuration -->
<active_sessions>
50 58 60 61 70 75 …
</active_sessions>
<interconnection_times>
1.2 0.3 4.95 1.5 0.1 0.9 …
</interconnection_times>
…
</plugin>
|
3.5.3 Configuring Addresses
This section introduces the XML tags for configuring client source and
destinations addresses, and server addresses.
The basic ideas are:
when clients make requests to servers, they bind to local
source addresses and ports, and connect to remote
destination addresses and ports;
servers bind to a server address and port, waiting for client
requests;
client source addresses can be specified, or can be set to allow the operating
system to assign a default local address (the same goes for servers).
All addresses (client source addresses, client destination addresses,
and server addresses) are defined using the XML tag <address_pool>,
but with different values for the required attribute name.
Within each address pool, there may be any number of <address>
elements.
Each <address> element must contain exactly two attributes:
ipv4 and port. The address element must be in a
CIDR-style format(6).
The port value
of 0 is a special value which indicates that the operating system
should automatically choose a local ephemeral port for the connection.
Likewise, the address "0.0.0.0" means that the client should bind to
the default local address, and the server should bind to "*".
For server addresses, only one address and port should be defined: multihoming
in this way is not implemented yet.
Note that these addresses say nothing about protocol.
Protocol-specific items are defined within plugin code.
The address attribute name "ipv4" suggests that other kinds
of addresses are possible. At present, only IPv4 addresses are
supported but it is conceivable that IPv6 will be supported in the
future. Using any attribute for an address except "ipv4" will
generate a configuration file parse error.
Continuing with the examples from above, the server address pool might
defined as:
| | <plugin … >
<!-- for a TCP server configuration -->
<active_sessions>
47
</active_sessions>
<file_sizes>
200 42000 300 1200 5400 …
</file_sizes>
<address_pool name="server_address">
<address ipv4='0.0.0.0' port='10000'/>
</address_pool>
</plugin>
|
In this case, the server binds to "*.10000". That is, port 10000 for any
local address on the server. For the client configuration, we define
a source address pool of 64 address (actually, 62 usable addresses, not
including the host and broadcast addresses) and for destination addresses
we define two separate class C networks (254 usable addresses):
| | <plugin … >
<!-- for a TCP client configuration -->
<active_sessions>
50 58 60 61 70 75 …
</active_sessions>
<interconnection_times>
1.2 0.3 4.95 1.5 0.1 0.9 …
</interconnection_times>
<address_pool name="client_source_addresses">
<address ipv4='192.168.1.0/26' port='0' />
</address_pool>
<address_pool name="client_destination_addresses">
<address ipv4='192.168.47.0/24' port='10000'/>
<address ipv4='192.168.46.0/24' port='9900'/>
…
</address_pool>
</plugin>
|
3.5.4 Putting It All Together
To wrap up the examples in this section, we fill in the main plugin attributes
to complete the configuration files. For the server:
| | <plugin name="ServerExample" objfile="tcp_plugin.so"
maxthreads="47", personality="server">
<!-- for a TCP server configuration -->
<active_sessions>
47
</active_sessions>
<file_sizes>
200 42000 300 1200 5400 …
</file_sizes>
<address_pool name="server_address">
<address ipv4='0.0.0.0' port='10000'/>
</address_pool>
</plugin>
|
And for the client:
| | <plugin name="ClientExample" objfile="tcp_plugin.so"
maxthreads="75", personality="client">
<!-- for a TCP client configuration -->
<active_sessions>
50 58 60 61 70 75 …
</active_sessions>
<interconnection_times>
1.2 0.3 4.95 1.5 0.1 0.9 …
</interconnection_times>
<address_pool name="client_source_addresses">
<address ipv4='192.168.1.0/26' port='0' />
</address_pool>
<address_pool name="client_destination_addresses">
<address ipv4='192.168.47.0/24' port='10000'/>
<address ipv4='192.168.46.0/24' port='9900'/>
…
</address_pool>
</plugin>
|
3.5.5 Nesting Configuration Files
A feature of Harpoon configuration files is that one file may include
another, allowing a user of Harpoon to nest configuration files and
reuse identical distribution data in more than one plugin without
duplicating the data itself.
Using the tag <config_file> as in the example below causes the
named file to be substituted in place:
| | <plugin … >
…
<config_file> file_sizes.xml </config_file>
…
</plugin>
|
Assume the file file_sizes.xml contains:
| | <file_sizes> 500 23423 837 7735 </file_sizes>
|
The resulting configuration would "behave" as if you had written:
| | <plugin … >
…
<file_sizes> 500 23423 837 7735 </file_sizes>
…
</plugin>
|
A very important thing to note is that each configuration file used by
Harpoon (whether it is a "top-level" configuration file or one that
is included by another) must be a well-formed XML document. One
consequence is that files can contain only one top-level element.
Essentially, this means that a file containing exactly the following:
| | <active_users> 55 67 79 80 100 140 142 130 110 </active_users>
<file_sizes> 500 23423 837 7735 </file_sizes>
|
is illegal -- the XML parser that Harpoon uses will
complain loudly. You must structure your config files to accomodate
this restriction.
Another point to note (which will be described again below) is that
while you may use file names that include full or relative paths, any
relative paths will be relative to the working directory of the
harpoon executable. Any plugin object files referenced in
configuration files will also be referred to relative to the working
directory of harpoon.
4. Running Harpoon
4.1 The harpoon executable
harpoon is the executable used to load modules for traffic
generation. Traffic generation is not implemented directly in
harpoon, it is rather a manager of traffic generation plugins.
Using command line parameters and an external management interface
(XML-RPC) you can load, unload, start, stop, and query traffic
generation modules.
4.1.1 harpoon command-line parameters
Most configuration is done through the external management interface, but
there are a few command line parameters for initial loading and configuration
of harpoon. These parameters are:
- ` -f filename'
With the `-f' switch you specify
Harpoon config files to be initially loaded. You may specify multiple
`-f' parameters in order to load more than one config file.
- ` -l logfile'
The argument to the `-l' switch is a file name to which log
messages will be appended. By default, log messages are written to
STDERR.
- ` -p port'
The `-p' flag sets the port that
Harpoon's internal HTTP server listens on. By default, this port is
8180.
- ` -s seed'
The `-s' option sets a specific seed
for random number generation. If this option is not set, the random
number generator is seeded using a combination of the current time and
Harpoon's process ID.
- ` -v verbiage_level'
The `-v' option sets the
level of verbosity for log messages spewed by Harpoon. The argument
to `-v' should be an integer from 0 to 10, with 0 meaning
minimal log messages are emitted, and 10 meaning lots of program
chatter is logged.
- ` -w warp_factor'
With the `-w' switch, you may set the number of seconds that
comprise an IntervalDuration. By default, this value is 60
seconds, so if the values given in P_{ActiveUsers represent
the number of active users per hour, it will take 24 minutes to
emulate a full day. See the full Harpoon paper for some of the issues
in setting this parameter.
- ` -c '
Use the `-c' flag to tell Harpoon to continuously cycle over its
values of P_{ActiveSessions. The default behavior is for Harpoon to
spend IntervalDuration time on each value of P_{ActiveSessions,
successively stepping through the series of number of active sessions and
stopping after the final value. With the `-c' flag, Harpoon will
cycle indefinitely over these P_{ActiveUsers values.
- ` -a '
Use the `-a' switch to cause Harpoon to not automatically cycle through
the values in P_{ActiveUsers. Using this flag, it is possible to
manually (through the XML-RPC interface) cycle through intervals. Harpoon
will ignore the `-w' switch if `-a' is set.
- ` -?'
This option dumps usage information on the above
command-line parameters. Unrecognized options given to
harpoon also have this effect.
In addition to harpoon command-line parameters described in
harpoon command-line parameters, two run-time features to be aware of are signal handlers implemented by Harpoon, and event logging capability of
Harpoon.
4.1.2 Signals Handled by Harpoon
The following table describes signals handled by Harpoon. All other
signals are blocked.
SIGINT SIGTERMSending an interrupt signal to Harpoon has the effect of shutting
Harpoon down. First, all user-level threads running plugin code are
shut down, then the HTTP/XML-RPC listener is stopped. Finally,
Harpoon crumples in a heap.
SIGUSR1Sending the USR1 signal has the effect of shutting down all user-level
plugin threads. All plugins are returned to the idle state. Harpoon
itself continues to process remote-interface method calls.
SIGUSR2Sending the USR2 signal to Harpoon causes all plugins to be reset
(analogous to the resetAll() XML-RPC method described below.)
First, all plugin threads are stopped, second, the emulated hour is
reset to 0, finally, plugin threads are restarted for all loaded
plugins.
4.1.3 Harpoon Event Logging
Logging capability within Harpoon is currently quite limited. Using
the `-v' option to the harpoon executable causes
different levels of log messages to be written or suppressed. All log
messages are currently written to STDERR by default, unless an
`-l' switch is given to harpoon.
4.1.4 Environment Variables
While there are no environment variables required specifically by
Harpoon, many operating systems will require setting the variable
LD_LIBRARY_PATH (or a similar variable, e.g,
DYLD_LIBRARY_PATH on MacOS X) in order to make
dynamic loading of plugins work properly. Before starting Harpoon,
this variable should be set to include the directory where plugin
modules are installed (often the same directory as Harpoon, but not
necessarily.) You are advised to consult the relevant manual pages
for reference (e.g., ldconfig and ld.so for Linux,
ld and ld.so.1 for Solaris, and dyld for MacOS
X.)
A script, run_harpoon.sh, is supplied with the software distribution
to automatically set the above environment variable and then invoke
the harpoon executable. If you perform a make install when
building Harpoon, this script will get installed and have the correct
paths. If you do not install Harpoon, the script won't work (because of
default installation path settings). If you want to use the script,
simply edit it to suit your needs.
4.2 Validating a configuration file with config_validator
config_validator takes only one argument, the config file
to be checked. It parses the given config file and prints diagnostics
on what was parsed. Examples of config file validation are given in
see section Validation of Configuration Files. The config_validator
uses the same code internally as Harpoon (and can be quite picky!) so
it really is a good idea to validate your config files using this tool.
Another way to validate your config files is to use a general-purpose
XML schema validation tool. One such tool on the Web is at
http://apps.gotdotnet.com/xmltools/xsdvalidator/Default.aspx.
The file harpoon_plugins.xsd (see XML Configuration Schema),
in the documentation directory of the Harpoon distribution, is an XML
schema defining the structure of Harpoon configuration files for the TCP
plugin. (Note that this file only defines the structure for TCP
plugins, therefore its use is limited. It is kept with the software
distribution mainly for historical reasons.)
For reference on XML schemas, see http://www.w3.org/XML/Schema.
Note that schemas serve a similar purpose as SGML DTDs, but are
written entirely in XML.
4.3 Self-configuration Tools
This section describes the command-line options for the three self-configuration
tools, harpoon_flowproc, harpoon_conf.py, and
harpoon_reconf.py.
4.3.1 harpoon_flowproc
The flow record processor tool takes the flow records as standard input
and produces a reformatted series of records (in ASCII) on standard
output. There are a number of limitations to this program, making it
unsuitable for very large flow record traces.
- ` -i'
One of the main tasks of harpoon_flowproc is to organize flow
records into a series of "sessions", which are connections between the
same IP host pair initiated within some duration of time. The `-i'
option allows the user to specify this duration of time in seconds. By
default, a value of 60 seconds is used. This value should also match the
value used for the `-i' to the harpoon_conf.py script.
- ` -n'
harpoon_flowproc, by default, expects to use flow-tools format
flow records (unless the flow-tools library is not found). To use
Netflow 5 wire format records, use the `-n' flag.
- ` -w'
harpoon_flowproc performs "flow surgery" to coalesce flow records
adjacent in time that are very likely referencing the same flow. By default,
only records containing SYN and FIN or RST flags will be used
("well-formed" flows). To relax this requirement, use the `-w' flag.
Using this option, no flow records will be ignored based on lack of TCP flags.
Note that flow surgery will not be performed if there are no TCP flags
present, regardless whether the `-w' option is set.
4.3.2 harpoon_conf.py
The harpoon_conf.py Python script takes the output of
harpoon_flowproc and produces XML configuration files that can
be used by Harpoon. While the configuration files may need some manual
tweaking for a particular environment, they can often be used right away.
harpoon_conf.py has one required argument, the file produced
from running harpoon_flowproc. All options listed below are
not required.
- ` -s'
Specify the point in time (floating point seconds) after which items
from the input file should be used. This is an absolute time (i.e., not
relative to the beginning of the trace). You might use this flag if you
want to restrict harpoon_conf.py to only process output records
for a particular time interval.
- ` -e'
Specify the point in time (floating point seconds) before which items
from the input file should be used. This is an absolute time (i.e., not
relative to the beginning of the trace). You'd probably use this flag in
conjunction with `-e' to only process output records
for a particular time interval.
- ` -i'
Specify the value of IntervalDuration to use. By default, a value
of 300 seconds is used. Generally, a longer value such as 300 or 600 seconds
is best.
- ` -m'
Specify the maximum number of lines to process from the input file. This
option is probably less useful unless you're doing some debugging. Normally,
using the `-s' and `-e' options are what you should really use
if you want to only process records over a particular time interval.
- ` -p'
Specify a string to use as a prefix for output files. If the string
`testprefix' is used, for example, the XML configuration files
`testprefix_tcpclient.xml' and `testprefix_tcpserver.xml' will
be produced. The default prefix is harpoonconf.
- ` -d'
Turn on some debugging chatter. Multiple `-d' options cause more
chatter.
- ` -D'
Specify a client destination address pool as a CIDR prefix. For example,
-D '192.168.1.0/24'. The `-D' option may be specified
multiple times.
- ` -S'
Specify a client source address pool as a CIDR prefix. For example,
-S '192.168.2.0/24'. The `-D' option may be specified
multiple times.
Note that the server address defaults to 0.0.0.0 with port 10000.
4.3.3 harpoon_reconf.py
The harpoon_reconf.py Python script reads existing client and
server config files and retunes them to produce specific traffic volumes.
Only bitrates can be specified at this time.
- ` -c'
Use this option to specify the client config file. This is a required option.
- ` -s'
Use this option to specify the server config file. This is a required option.
- ` -i'
Specify the value of IntervalDuration with the `-i' option.
Default value is 300 seconds.
- ` -r'
Specify the target rate in bits per second using this option. This is
a required option.
- ` -d'
Turn on debugging chatter.
5. Managing harpoon
In addition to using XML for its config files, Harpoon includes a
restricted HTTP daemon which understands POST commands for XML-RPC,
and PUT commands for upload of configuration and plugin files. These
interfaces can be used to remotely manage Harpoon daemons. This chapter
describes a usage of a PHP script for web-based Harpoon management. We
also give details on the XML-RPC / HTTP interfaces to Harpoon.
5.1 Web-based Management
A PHP (http://www.php.net) script (manage_harpoon.php) and some
Javascript and CSS support files are included with Harpoon to facilitate
large-scale management of Harpoon. This section describes usage and design
of this feature.
Sorry - this script is not documented yet (and not fully tested anyway).
5.1.1 Using manage_harpoon.php
FIXME
5.1.2 Setting up Apache and PHP
FIXME
5.2 Lower-level Management Interfaces
A restricted HTTP server is embedded in Harpoon which allows remote management
using XML-RPC. The HTTP PUT method is also understood, allowing upload of
XML configuration files and plugin binaries to remote Harpoon daemons. This
section describes these low-level details of managing Harpoon. Normally, you
do not need to be concerned with these details unless the supplied web
interface is insufficient for your needs.
5.2.1 Supported XML-RPC Methods
The following table lists all XML-RPC methods recognized by Harpoon.
The harpoon executable listens to port 8180 by default for
requests. This can be changed with the `-p' switch, described
in See harpoon command-line parameters. There are simple Python scripts
supplied with the Harpoon distribution that demonstrate the basics of
making management RPCs. For further reference, see
http://www.xmlrpc.org/ (there is a very useful tutorial
available at this site) and the Python documentation, available at
http://www.python.org/.
A restriction to be aware of with the XML-RPC interface of Harpoon is
that it is single-threaded. That is, it can only handle one
request at a time. This implementation has the side-effect that any
call that blocks for some amount of time will prevent any subsequent
calls from executing until the blocked call finishes. (The primary
reason for implementing the listener as a single thread is to limit
the number of threads used by harpoon itself, leaving as
many resources available as possible for user-level traffic generation
threads.)
Simple scripts using each of the interfaces described below are provided
in the `cli' subdirectory. You may also wish to look briefly the
stats.py tool example for a concrete reference using one of these
interfaces.
system.listMethodsList all methods recognized by the server. Other standard
system interfaces, such as system.methodSignature and
system.methodHelp are not (yet) available.
system.nullPing the server. Returns the string null. No parameters are
expected.
loadConfigLoad an XML configuration file. The file name is given as a parameter
to this method. The file name may include a relative path from the
working directory of harpoon. Note that any configuration
files nested in the one currently being loaded (named by this method)
must also be named with paths relative to the working directory of
harpoon. A boolean value is returned indicating success or
failure.
unloadConfigUnload a plugin configuration. The plugin name is supplied as a
parameter to this method. Any plugin state is destroyed (a la
unloadPlugin() -- see below), and configuration data for the plugin
is also destroyed. The plugin must be idle for this method to
succeed. A boolean value is returned indicating success or failure.
queryPluginsReturns a list of structures describing all plugin configurations that
have been loaded. No parameters are expected.
unloadPluginUnload the shared object implementing a plugin, leaving the
configuration in-tact. One parameter is expected, the name of the
plugin. The plugin must have been previously stopped for this call to
succeed. Returns a string indicating success or failure. This call
can be useful to destroy any static state retained by the plugin
across calls to startPlugin and stopPlugin. That
is, any statistics held in static variables of the class implementing
the plugin are wiped clean as a side-effect. A boolean value is returned
to indicate success or failure.
loadPluginOne parameter is required, the plugin name. Load the shared object
for the plugin named in the parameter. The plugin configuration must
already have been loaded for this call to succeed. A boolean value is
returned indicating success or failure.
stopPluginOne parameter is required, the plugin name. Stop all threads running
for the named plugin. Returns a boolean indicating success or failure.
Note that this call may take non-negligible time because of delay in
gracefully stopping traffic generation threads. Be patient.
startPluginOne parameter is required, the plugin name. Starts user-level threads
for the named plugin. If the shared object for the plugin has not
already been loaded, this loading is done as a side-effect of this
call. The plugin must be idle and/or unloaded for this call to
succeed. A boolean value is returned indicating success or failure.
getStatsNo parameters are expected. Returns an array of structures indicating
status and statistics of Harpoon and all loaded plugins.
resetAllNo parameters are expected. Stops all running plugins, resets the
emulated hour to 0 (zero) and restarts all plugins. A boolean value
indicating success or failure is returned.
suicideNo parameters are expected. Initiates a shutdown of all threads
inside Harpoon, including Harpoon itself. A meaningless string is returned.
5.2.2 Uploading Files with HTTP PUT
In addition to processing XML-RPC methods using the HTTP POST command
over port 8180, Harpoon also recognizes HTTP PUT commands. Using PUT
can be useful in distributing configuration and plugin files across a
number of Harpoon processes. No tools are distributed with Harpoon
for distributing files. You are advised to use existing free tool
such as curl or wget for this task. The
destination file name is given as the URI, and may include a relative
path. Any preceeding forward slashes are discarded.
Examples of uploading configuration files and plugins using curl are
given below:
| | $ curl --upload-file dummy_plugin.xml \
http://10.2.0.2:8180/dummy_plugin.xml
% Total % Recvd % Xferd Average Speed Time Curr.
Dload Upload Total Current Left Speed
100 961 0 0 100 961 0 961 0:00:01 0:00:00 0:00:01 961
100 963 0 2 100 961 2 961 0:00:01 0:00:00 0:00:01 0
$
$ curl --upload-file dummy_plugin.so \
http://10.2.0.2:8180/test/dummy_plugin.so
% Total % Recvd % Xferd Average Speed Time Curr.
Dload Upload Total Current Left Speed
54 37563 0 0 54 20480 0 20480 0:00:01 0:00:00 0:00:01 20480
100 37565 0 2 100 37563 2 37563 0:00:01 0:00:00 0:00:01 2780k
$
|
In the first example, an XML configuration file
(dummy_plugin.xml) is written to the
working directory of Harpoon. In the second example, a shared object
plugin dummy_plugin.so is written to the test
subdirectory under the working directory of harpoon.
Note that there are clear security consequences of the PUT command. At
present there is no support for authentication or encryption of
transactions using SSL. There is also at present no way disable the
XML-RPC interface. These features may be added at a later date.
A. More Examples
A.1 XML Configuration Files
The following examples show portions of the configurations
`tcp_client_ex2.xml' and `tcp_server_ex2.xml' provided in
the `examples' subdirectory of the Harpoon software distribution.
Not all distribution data is printed (noted by the ellipses in the
examples).
First, the client configuration:
| | <harpoon_plugins>
<plugin name="TcpClient" objfile="tcp_plugin.dylib"
maxthreads="10" personality="client">
<active_sessions> 10 </active_sessions>
<interconnection_times>
...
3.993905 0.293601 2.127093 0.174206 0.391431
2.579116 0.273442 0.358623 0.173357 1.454077
...
</interconnection_times>
<address_pool name="client_source_pool">
<address ipv4="10.54.40.2/32" port="0" />
</address_pool>
<address_pool name="client_destination_pool">
<address ipv4="10.54.40.1/32" port="10000" />
</address_pool>
</plugin>
</harpoon_plugins>
|
Now, for the server configuration:
| | <harpoon_plugins>
<plugin name="TcpServer" objfile="tcp_plugin.dylib"
maxthreads="37" personality="server">
<file_sizes>
...
1034 9710 559390 52641 2122 2643 16167 22667 23660 20271790 14009
...
</file_sizes>
<active_sessions> 37 </active_sessions>
<address_pool name="server_pool">
<address ipv4="0.0.0.0" port="10000" />
</address_pool>
</plugin>
</harpoon_plugins>
|
If you wish to use these files to produce a specific traffic volume
(bit rate), see
[tuning traffic volume with harpoon_reconf.py],
[harpoon_reconf.py command-line parameters ],
or [basic use of harpoon_reconf.py].
You may also wish to change the addresses to match your environment. See
[modifying configuration file addresses]
or [address configuration] for that information.
A.2 Validation of Configuration Files
We now validate the above configuration files and show the output of
config_validator for each. (Note that there are slight local
modifications to these config files so the output will not exactly match
running config_validator on these same files in the Harpoon
software distribution.)
| | $ config_validator tcp_client_ex2.xml
loading ../examples/tcp_client_ex2.xml
bad address - no prefix len?
Checking load of TcpClient
name: TcpClient
objfile: tcp_plugin.dylib
maxthreads: 50
personality: client
client source pool:
address list:
10.54.0.22 - 10.54.0.22 :0 (1)
client destination pool:
address list:
10.54.46.0 - 10.54.46.255 :10000 (256)
dumping distributions (first 10):
active_sessions: 12 27 40 41 36 48 50 50 49 25
interconnection_times: 3.99391 0.293601 2.12709 1.21451 0.409159 0.1121
0.580837 0.101379 0.724933 0.224031
$
|
| | $ config_validator tcp_server_ex2.xml
loading ../examples/tcp_server_ex2.xml
bad address - no prefix len?
Checking load of TcpServer
name: TcpServer
objfile: tcp_plugin.dylib
maxthreads: 37
personality: server
server address pool:
address list:
0.0.0.0 - 0.0.0.0 :10000 (1)
dumping distributions (first 10):
active_sessions: 37
file_sizes: 18643900 15150 807481 157679 23465 4930 39188 4418 56341 10863
|
A.3 Example Using Two Hosts, Unidirectional Traffic
For the above client and server configuration files, assuming that
the client source and destination addresses are set up correctly, we're
ready to start up Harpoon and generate traffic.
For the server, you should see something like this:
| | $ export LD_LIBRARY_PATH=\
$LD_LIBRARY_PATH:/home/jsommers/harpoon/src/plugins
$ ./harpoon -f ../examples/tcp_server_ex2.xml -v10 -w300 -c
loading ../examples/tcp_server_ex2.xml... bad address - no prefix len?
finished.
Checking load of TcpServer
name: TcpServer
objfile: tcp_plugin.so
maxthreads: 37
personality: server
server address pool:
address list:
0.0.0.0 - 0.0.0.0 :10000 (1)
dumping distributions (first 10):
active_sessions: 37
file_sizes: 15150 807481 157679 23465 4930 39188 4418 56341 10863
11:06:04 sev(07) stopping plugin TcpServer
11:06:04 sev(00) TcpServer: plugin stopped - threads killed and reaped
11:06:04 sev(07) starting plugin TcpServer
11:06:04 sev(02) TcpServer: no plugin state existed on start - created
11:06:04 sev(01) TcpServer: started plugin with 37 threads.
11:06:04 sev(01) <stopping plugins: TcpServer:ok >\
<starting plugins: TcpServer:ok >
11:06:04 sev(09) harpoon started. verbosity<10>warp_factor<300>\
autoincr?<1>continuousrun?<0>
11:06:04 sev(05) 000.00 - emulation time tick
…
CTRL-c
going down in a ball of flames...
$
|
Note that:
the variable LD_LIBRARY_PATH was set prior to starting Harpoon,
and was specified using Bourne shell syntax;
the start up script was not used, so the above variable had to be set;
the `-c' flag was used so that Harpoon will continuously
cycle over its list of active sessions--this is typically what is desired
for a server;
the sixth log line (starting "11:06:04 sev(01) <stopping plugins: TcpServer:ok >" indicated that initial starting of the plugin was successful
(note that the plugin is first stopped and then started--this is normal);
each log line has the wall-clock time (hour:minute:second), a
severity indication (ranging from 0, most important, to 10, debug jabber),
Harpoon emulation time (epoch.fractional epoch), and the actual log message
(note that the severity levels are currently rather inconsistent--sorry);
the process was stopped by hitting CTRL-c.
The client side startup looks very similar, so it is not shown. Using
either your own monitoring tools or the XML-RPC scripts (e.g.,
stats.py), you should be able to see evidence of traffic flowing.
A.4 Example Using Two Hosts, Bidirectional Traffic at Different Rates
Taking the previous example, we now want to do the following:
move the installation to two different hosts;
generate traffic in two directions;
set up traffic so 10 Mbps is generated in one direction and
20 Mbps is generated in the other direction.
Assume that host A has an IP address of 10.0.1.1, and host B has
an address of 10.0.1.2. Assume also that we want the volume to be
relatively steady over 300 second intervals.
It's easiest if we work backwards based
on the requirements above. First, we want to find out how many active
sessions we need for generating 10Mbps, and how many sessions for 20 Mbps.
To accomplish this, we need to use the harpoon_reconf.py script:
| | $ harpoon_reconf.py -c tcp_client_ex2.xml -s tcp_server_ex2.xml -i 300 \
-r 10000000 -d
target volume: 375000000.0
interval duration: 300
client conf file: ../examples/tcp_client_ex2.xml
server conf file: ../examples/tcp_server_ex2.xml
target: 375000000.0 carry: 0
targetbytes 375000000.0 simbytes 407692953 median 7 mean 6 \
stdev 1.50339682726 max 9 flows 3758
number of sessions should be 6 to achieve volume of 375000000 bytes \
(10000000.0 bits/sec)
|
As arguments to harpoon_reconf.py, we supply the two existing
configuration files (`tcp_client_ex2.xml' and `tcp_server_ex2.xml'),
the interval duration (300 seconds), and the desired rate (10000000 bits per
second). (We also supplied the `-d' flag to get a little more verbose
output.) We see that there should be 6 sessions configured to produce
10 Mbps. In a similar way, we find that there should be 11 sessions configured
to produce 20 Mbps.
Next, we need to create some new configuration files based on our existing
files. Since the source and destination addresses for our clients are
different, we need two separate client configuration files. We'll use
default addresses for the server, so we only need one server config file
for both machines.
The steps should be:
copy `tcp_client_ex2.xml' to `clientA.xml' and
`clientB.xml';
edit `clientA.xml' to have source address of 10.0.1.1,
destination address of 10.0.1.2, and number of active sessions
as the single value 6 (also make sure that maxthreads attribute
is set to at least 6);
edit `clientB.xml' to have source address of 10.0.1.2,
destination address of 10.0.1.1, and number of active sessions
as the single value 11 (also make sure that maxthreads attribute
is set to at least 11);
move `clientA.xml' and a copy of `tcp_server_ex2.xml' to
host A, and `clientB.xml' and a copy of `tcp_server_ex2.xml' to
host B;
start up servers;
start up clients.
Once we start things up, we see that the 10 second averages over one 50
second period (in the 10Mbps direction) are: 15212977, 10309469, 9073456,
9846232, 14869665, which gives an average of about 11.8Mbps. Over a longer
period, the average comes closer to 10Mbps, though generally will never
be exactly 10Mbps. It should, however, be close over the range of an
interval duration. Again, the quality of the match depends on a number
of things, including the interval duration, the maximum inter-connection
time (specified when using the self-configuration tools),
and the nature of the inter-connection
and file size distributions (heavy-tailed distributions need to be sampled
over a long duration for the sample mean to come close to the distributional
mean).
For the 20Mbps direction, we also take 10 second averages using SNMP. Over
a 160 second duration, the samples are:
14028319, 23009625, 19027488, 20827397, 31798955, 32786164, 13115353, 15678779,
13945478, 11020225, 14158496, 10773346, 15449599, 18931181, 24803243, 26993437
which gives an average of 19.1Mbps--pretty close to 20Mbps, even over
a shorter interval and the specified 300 seconds.
A.5 Example with Three Hosts
Finally, we want to do the following:
set up two client machines (A and B) to make requests to a single server;
generate 10 Mbps on reverse path to client A, and 5 Mbps on reverse path
to client B;
set up two server processes to handle the load, so that one process
serves client A, and the other process serves client B.
To our network of hosts A and B, we add a new machine, host C, with IP address
10.0.1.3. We'll use host C as our server.
The easiest thing is to set up the server config files. Since we want
to set up two processes to handle the server load, we'll need two configuration
files:
copy the original server config file `tcp_server_ex2.xml' to
`serverA.xml' and `serverB.xml';
edit `serverA.xml' to listen on port 10001 for client connections
from host A (find the address pool toward the end of the file);
edit `serverB.xml' to listen on port 10002 for client connections
from host B (find the address pool toward the end of the file);
move these two config files to host C.
The server processes can now be started. You may wish to start them in
the background, writing to separate log files. The other item you should
be aware of is that the XML-RPC ports should be set differently from the
default, otherwise these servers will clash. Assuming we've already
set LD_LIBRARY_PATH, the start up lines should be something like:
| | $ harpoon -f serverA.xml -p 8181 -l serverA.log -w300 -c -v10 &
$ harpoon -f serverB.xml -p 8182 -l serverB.log -w300 -c -v10 &
|
Now, we need to set up the client config files. Since we already set the
client source address in the previous example (see see Bidirectional Traffic at Different Rates: (example with two hosts and bidirectional traffic)Example Using Two Hosts), we just need to set the destination addresses and ports
correctly, and set the number of active sessions to produce the desired
volumes.
First, we need to find out how many sessions should be active to produce
5Mbps:
| | $ harpoon_reconf.py -c clientB.xml -s serverB.xml -i 300 -r 5000000 -d
target volume: 187500000.0
interval duration: 300
client conf file: ../examples/tcp_client_ex2.xml
server conf file: ../examples/tcp_server_ex2.xml
target: 187500000.0 carry: 0
targetbytes 187500000.0 simbytes 209525866 median 4 mean 3 \
stdev 0.891882585016 max 5 flows 2050
number of sessions should be 3 to achieve volume of 187500000 bytes \
(5000000.0 bits/sec)
|
harpoon_reconf.py shows that there should be three sessions active
to produce 5Mbps.
Now, we can edit the client config files and start the clients up:
edit `clientA.xml' to have host C (10.0.1.3) as the
destination address and 10001 for the destination port
(note that we already have the number of active sessions set to produce
10Mbps);
edit `clientB.xml' to have host C (10.0.1.3) as the
destination address and 10002 for the destination port;
also in `clientB.xml', set the number of active sessions to three.
Now, start up the clients:
| | hostA$ harpoon -f clientA.xml -w300 -v10
…
hostB$ harpoon -f clientB.xml -w300 -v10
|
After a while, we check the server A process to see how much traffic
is being generated using the stats.py script:
| | $ stats.py -u http://hostC:8181/
stats for <ServerProxy for hostC:8181/>
server-wide information:
emulation_interval 0
----
plugin-specific information:
TcpServer is running - up for 117 seconds
target threads = 37 active threads = 37
num_transfer = 639
send_bandwidth_total_bps = 4588290.0
send_bandwidth_recent_bps = 5593370.0
bytes_sent_total = 67103700.0
bytes_sent_recent = 53137000.0
personality = server
|
We see that about 5Mbps is being generated, which is what we wanted.
Note that for all these examples, we have not specified any physical
connections, any emulated round-trip times, routes, or the like. These
configuration settings are outside the domain of Harpoon. You should
set these parameters based on requirements for your tests. You should
also be aware that changing these network parameters (as opposed to
application layer parameters in Harpoon) can make very significant
differences in the nature of the generated traffic. Refer to the
Harpoon technical paper for examples of such differences.
B. XML Configuration Schema
The schema defining TCP plugin configuration files is given below for
reference. (This file lives in the documentation subdirectory of the
Harpoon software distribution.) Someday maybe there will be a nice parser
generator to justify this file's existence. (But then I'll have to
fix the logical bugs in the file...)
| |
<xsd:schema xmlns:xsd="http://www.w3.org/2001/XMLSchema">

<xsd:annotation>
   <xsd:documentation xml:lang="en">

   this is an xml schema for harpoon configuration files.
   copyright 2004 joel sommers.

   an xml schema is a way to define the structure of xml documents using
   xml itself.  note that dtd (document type definitions) have a similar
   function, yet are written using sgml rather than xml.  for more
   info, see: http://www.w3.org/TR/xmlschema-1/.  a useful validator
   on the web is at:
   http://apps.gotdotnet.com/xmltools/xsdvalidator/Default.aspx.

   <!--
        $Id: harpoon_manual.html,v 1.2 2005/12/07 17:07:00 jsommers Exp $
     -->

   </xsd:documentation>
</xsd:annotation>


<xsd:element name="harpoon_plugins" type="pluginList" />

<xsd:complexType name="pluginList">
  <xsd:sequence>
    <xsd:element name="plugin"
                 minOccurs="1" maxOccurs="unbounded"
                 type="pluginSpecifier" />
  </xsd:sequence>
</xsd:complexType>


<xsd:complexType name="pluginSpecifier">
   <xsd:sequence>
      <xsd:element name="config_file" type="xsd:string"
                   minOccurs="0" maxOccurs="unbounded" />

      <!--
        NB: these element are only required for implementation of TCP
        sources, and there are different specific requirements at
        a server or client (which are not specified in this schema).
        also, there are different elements required for different
        sources.  refer to the manual...

        NB: also, defining the sub-elements of the plugin as a sequence
        is overly restrictive, since they must appear in the same order
        as below.  in the actual code, we don't make that restriction;
        elements can appear in any order.
        -->

      <xsd:element name="interconnection_times" type="float_list"
                   minOccurs="0" maxOccurs="unbounded" />

      <xsd:element name="active_sessions" type="int_list"
                   minOccurs="0"  maxOccurs="unbounded" />

      <xsd:element name="file_sizes" type="int_list"
                   minOccurs="0"  maxOccurs="unbounded" />

      <xsd:element name="address_pool" type="addressList"
                   minOccurs="0" maxOccurs="unbounded" />

  </xsd:sequence>

  <xsd:attribute name="name" type="xsd:string" use="required"/>
  <xsd:attribute name="objfile" type="xsd:string" use="required"/>
  <xsd:attribute name="maxthreads" type="xsd:int" use="required"/>
  <xsd:attribute name="personality" type="personalityType"
                 use="optional"/>

</xsd:complexType>


<xsd:simpleType name="int_list">
  <xsd:list itemType="xsd:unsignedLong"/>
</xsd:simpleType>

<xsd:simpleType name="float_list">
  <xsd:list itemType="xsd:float"/>
</xsd:simpleType>

<xsd:simpleType name="personalityType">
  <xsd:restriction base="xsd:string">
    <xsd:enumeration value="client"/>
    <xsd:enumeration value="server"/>
    <xsd:enumeration value="unknown"/>
  </xsd:restriction>
</xsd:simpleType>

<xsd:simpleType name="addressPoolType">
  <xsd:restriction base="xsd:string">
    <xsd:enumeration value="client_source_pool"/>
    <xsd:enumeration value="client_destination_pool"/>
    <xsd:enumeration value="server_pool"/>
  </xsd:restriction>
</xsd:simpleType>

<xsd:complexType name="addressList">
   <xsd:sequence>
      <xsd:element name="address"
                   minOccurs="1" maxOccurs="unbounded"
                   type="addressSpecifier"/>
   </xsd:sequence>
   <xsd:attribute name="name" type="addressPoolType" use="required"/>
</xsd:complexType>

<xsd:complexType name="addressSpecifier">
  <xsd:attribute name="ipv4" type="ipv4Type" use="required"/>

  <!-- NB: not restrictive enough -->
  <xsd:attribute name="port" type="xsd:nonNegativeInteger"
                 use="required"/>
</xsd:complexType>

<xsd:simpleType name="ipv4Type">
  <xsd:restriction base="xsd:string">
     <!-- NB: not completely accurate, but sufficient for now -->
     <xsd:pattern value="\d{1,3}(\.\d{1,3}){0,3}(\/(\d+)){0,1}" />
  </xsd:restriction>
</xsd:simpleType>

</xsd:schema>
|
C. Creating New Traffic Generation Modules
Creating a new traffic generation module can be as simple as
subclassing the HarpoonPlugin class. There are five pure
virtual methods that must be overwritten to accomplish this:
bool init(HarpoonPluginConfig*)
void client_session(void)
void server_session(void)
void stats(std::ostream&)
void shutdown(void)
A toy example is given below. It is a good idea to review the
documentation and code for the TCPPlugin before attempting to
write your own plugin.
Note in the example below that the C symbol factory_generator is the
symbol for which harpoon searches. This function returns just
returns a new traffic generator object that implements the five specific
entrypoints named above.
There are some tricks to maintaining common data structures for a plugin.
See the TCPPlugin for documentation and an example of this behavior.
| | class DummyPlugin : public HarpoonPlugin
{
public:
DummyPlugin() : HarpoonPlugin() {}
virtual ~DummyPlugin() {}
// plugin general, and thread specific configuration. this method
// is called for every thread, so you must be careful not to
// re-initialize anything.
virtual bool init(HarpoonPluginConfig *hpc)
{
HarpoonPlugin::init(hpc);
return true;
}
// if plugin personality is client, this method is called
virtual void client_session()
{
std::cerr << "dummy client session begin" << std::endl;
sleep(10);
std::cerr << "dummy client session end" << std::endl;
}
// if plugin personality is server, this method is called
virtual void server_session()
{
std::cerr << "dummy server session begin" << std::endl;
sleep(10);
std::cerr << "dummy server session end" << std::endl;
}
// called for all threads when the plugin is being shut down.
virtual void shutdown()
{
std::cerr << "dummy shutdown" << std::endl;
return;
}
// best to check your own personality here to decide what stats
// to return.
virtual void stats(std::ostream &os)
{
XmlRpcUtil::encode_struct_value(os, "dummystats", "no stats!");
}
};
/*
* factory function. "factory_generator" is the C symbol we look for
* when loading harpoon plugins. (We use a C factory function to get
* around C++ name mangling issues.)
*/
extern "C"
{
Harpoon::DummyPlugin *factory_generator(void)
{
return (new Harpoon::DummyPlugin());
}
}
|
Postscript
The full technical paper describing Harpoon appeared in the Internet
Measurement Conference, Taormina, Sicily, Italy, in October 2004
(http://www.cs.wisc.edu/~jsommers/pubs/p173-sommers.pdf).
Harpoon first appeared as an extended poster at the SIGMETRICS conference,
New York, New York, USA, in June 2004
(http://portal.acm.org/citation.cfm?doid=1005686.1005733).
Thanks to Jeff Sommers for making the Harpoon icon. Thanks to Dave
Plonka at the University of Wisconsin for help understanding limitations of
flow records.
Index
Footnotes
http://www.cisco.com/univercd/cc/td/doc/cisintwk/intsolns/netflsol/nfwhite.htm.
See, for example, Vern Paxson's thesis
(ftp://ftp.ee.lbl.gov/papers/vp-thesis/dis.ps.gz).
http://expat.sourceforge.net
http://www.splintered.net/sw/flow-tools
http://www.python.org
A current limitation with this scheme is
that all four bytes of an IPv4 address must be given even for short
prefixes. Instead of writing 10.5/16, you should write
10.5.0.0/16.
Table of Contents
About This Document
This document was generated by joel sommers on December, 7 2005 using texi2html 1.70.
The buttons in the navigation panels have the following meaning:
| Button |
Name |
Go to |
From 1.2.3 go to |
| [ < ] |
Back |
previous section in reading order |
1.2.2 |
| [ > ] |
Forward |
next section in reading order |
1.2.4 |
| [ << ] |
FastBack |
beginning of this chapter or previous chapter |
1 |
| [ Up ] |
Up |
up section |
1.2 |
| [ >> ] |
FastForward |
next chapter |
2 |
| [Top] |
Top |
cover (top) of document |
|
| [Contents] |
Contents |
table of contents |
|
| [Index] |
Index |
index |
|
| [ ? ] |
About |
about (help) |
|
where the Example assumes that the current position is at Subsubsection One-Two-Three of a document of the following structure:
- 1. Section One
- 1.1 Subsection One-One
- 1.2 Subsection One-Two
- 1.2.1 Subsubsection One-Two-One
- 1.2.2 Subsubsection One-Two-Two
- 1.2.3 Subsubsection One-Two-Three
<== Current Position
- 1.2.4 Subsubsection One-Two-Four
- 1.3 Subsection One-Three
- 1.4 Subsection One-Four
This document was generated by joel sommers on December, 7 2005 using texi2html 1.70.